IvraeeOfficer

Joined: 01 Feb 2010
Posts: 7
|
re: Mythic Oregorger
 by Ivraee on Sat Mar 14, 2015 12:34 pm by Ivraee on Sat Mar 14, 2015 12:34 pm
Video: https://www.youtube.com/watch?feature=player_embedded&v=dOsvpY572gs
Abilities and Explanation
The storehouses of the Blackrock Foundry, laden with heaps and pallets of unprocessed Blackrock ore, represent a grand banquet feast for the ravenous rock-eating goren who have burrowed into the chamber. Oregorger is by far the largest of the invaders, gluttony swelling his frame far beyond the size of any goren previously seen in Draenor.
Phase 1 (Satiated Slaughter)
When sated, Oregorger draws upon his Ore reserve to unleash powerful attacks against his enemies.
 Acid Torrent (2.5 sec cast): Acid Torrent (2.5 sec cast):
- Sprays a cone of acid at a random ranged foe, inflicting 1,039,694 Physical damage to the closest player and increasing that player's damage taken from Acid Torrent by 1,039,694 for 20 sec. All other targets take up to 519,847 Nature damage, reduced by the closest player's total damage mitigation.
 Retched Blackrock (1 sec cast, 20sec cooldown): Retched Blackrock (1 sec cast, 20sec cooldown):
 Regurgitates Blackrock Ore at a target, leaving a pool of acid that inflicts Nature damage every 1.5 sec. Regurgitates Blackrock Ore at a target, leaving a pool of acid that inflicts Nature damage every 1.5 sec.
 Explosive Shard: Explosive Shard:
- Launches an explosive shard, inflicting 190,610 Physical damage and knocking back enemies in the area. After 3 sec, the shard explodes, dealing 216,603 Fire damage and stunning nearby enemies for 3 sec.
 Blackrock Barrage (1.5 sec cast, 20 sec cooldown): Blackrock Barrage (1.5 sec cast, 20 sec cooldown):
- Launches Blackrock Spines, inflicting 89,189 Physical damage to all enemies.
 Acid Maw: Acid Maw:
- Covers the target in acid, inflicting 29,874 Nature damage every 2 sec for 8 sec.
Phase 2 (Feeding Frenzy)
When his Blackrock Ore reserves have depleted, Oregorger rampages through the room, trampling all in his path as he searches for ore to eat.
 Rolling Fury: Rolling Fury:
- Becomes a rolling juggernaut, inflicting 433,206 to 433,206 Physical damage and knocking down anyone in the way.
 Earthshaking Collision: Earthshaking Collision:
- Shakes the earth, inflicting 56,761 Nature damage to all players.
- In Mythic difficulty, these collisions also leave Unstable Slag residue at the location of the collision. Unstable Slag explodes if another collision occurs at the same location.
 Unstable Slag Explosion: Unstable Slag Explosion:
- Unstable Slag explodes, sending waves of fire in all directions that inflict 76,448 Fire damage. These waves of fire will detonate other Unstable Slag they hit.
 Hunger Drive: Hunger Drive:
- The longer Oregorger remains in Feeding Frenzy, the more furious he grows, increasing damage inflicted by Earthshaking Collision by 5% per application. Stacks 100 times.
Execution and Setup
Oregorger has a enrage timer, but it is not a fixed time after you engage the boss. Instead the Boss will start doing massive AoE damage the third time his energy gets depleted. The reason why it is not an exact timer is because Oregorger's energy will go down faster if you miss some interrupts. It really isn't a tight enrage though, as long as your raid stays alive.
Tanks: 2
- It doesn't really matter which tank classes you bring to this fight. The only thing that is important is that they use their damage reduction cooldowns and their active mitigation correctly (for the acid torrents).
- Also the tanks need to call out for externals cooldowns either for themselves or the raid if needed.
Healers: 5
- A balanced healing setup will do just fine for this fight. There isn't anything special that healers need to do in this fight other than just out healing the raid and tank damage.
- It is very important that none of the healers dies though, because that can lead to some people not being in range or in line of sight of any healer during Phase 2.
DPS: 13
- Pretty straight-forward fight for the DPSers as well. Maximize Boss damage in Phase 1, kill the ore crates as fast as possible in Phase 2.
- Keep track of where the Boss is during Phase 2 and the possible routes it might roll towards, in order to be prepared and not get caught in a bad spot.
Phase 1 Strategy (Satiated Slaughter)
Phase 1 is very simple and can be easily broken down to countering each of the Boss's abilities one by one.
Retched Blackrock:
- This can only target ranged players and since it forces you to move if it spawns on you, you want to split your ranged dpsers and healers into 2 camps. This will make it so that only half of your ranged players will have to move at any given time, which is a dps increase and also ensures that half your healers are standing still and casting at any given time.
- Now you might ask, why not just spread around so only very few players have to move? The reason why we only have 2 camps is because you want to manipulate where these Retched Blackrocks land, so that the whole room doesn't get flooded with them, which would make Phase 2 way harder.
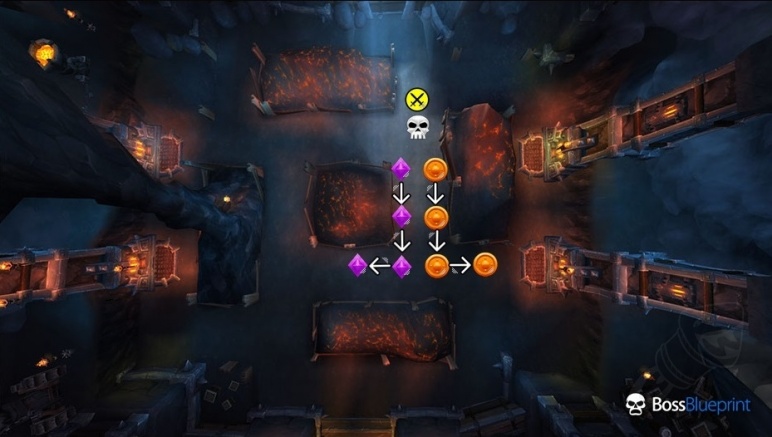
- As you can see at the picture below, the 2 ranged groups (Circle and Diamond Marker) are standing right next to each other in front of the Boss, and every time one of these groups gets a Retched Blackrock, they move a few steps backwards. If you are unlucky and all of them are targeted at one of the two groups, you might have to move right or left, but that would only be close to the end of your Phase 1.
- Keep in mind that Dpsers can still hit the Boss through the walls, but healers can't target the players through them. That means that if this happens, the healers will need to instead move into the other ranged camp, so that they can still reach everyone.
Phase 1 Positioning:
Explosive Shards:
- These can only be spawned on your melee players.
- Countering this ability is very simple. You just have all your melee stacked on the right leg of the Boss at the start of the fight, and once the first Explosive Shard spawns on them (you will know because you get knocked back a little), they all move to the Boss's left leg to avoid the explosion of the shard.
- When the second Shard spawns, move back to the right leg and repeat the same movement until the Phase is over.
Blackrock Barrage:
- Oregorger will cast Blackrock Barrage 5 times back to back every 20 seconds or so. You will need to have an interrupt rotation for these casts.
- Since it is only a 1.5 second cast and because it is easy to forget which cast number it is, make sure to have a Boss Mod addon that announces it.
- The thing that makes it a bit annoying to interrupt these casts is that the Boss will do his other abilities in between his 5 Blackrock Barrages and that might lead to players accidentally trying to interrupt the wrong spell. Therefore it is good to have 2 players assigned to each interrupt for that extra safety net if one of them missed his interrupt.
Acid Torrent:
- Acid Torrent is the ability the tanks need to worry about. The tank which is tanking Oregorger when he casts an Acid Torrent needs to make sure to have his active mitigation up and also a damage reduction cooldown. If the tank doesn't have any cooldown ready, he needs to ask for one from the healers/dps warriors/ret paladins.
- If he takes an Acid Torrent without the above, the raid will take insane amounts of raid damage.
- Now the other tank which wasn't tanking Oregorger should not be standing in front of the Boss, but instead be on the side, avoiding the cone of the Acid Torrent. Then he needs to taunt the Boss after the Acid Torrent, because of the Acid Maw debuff. You don't want to be tanking while this debuff is on you.
- Keep in mind that the tanks should track each other's survivability cooldowns and should wait for them to drop off before taunting.
- It will also be greatly appreciated from your healers if you call out when a raid cooldown is needed (when you won't mitigate much of the Acid Torrent damage).
Phase 2 Strategy (Feeding Frenzy)
Once the Boss reaches 0 energy, he will stop attacking the tanks and will move to the closest position from which he can cast Rolling Fury. There will also be Ore Crates spawning all around the room, which need to be killed in order to release the ore and have Oregorger roll over and eat them.
You want this phase to be over as fast as possible and the best way to achieve that is by splitting the raid up into 4 different groups, consisting of 5 players each (1 healer required in each group). Even though you can still dps the Boss during this phase, it is better to have everyone destroy the ore crates asap, so that Oregorger reaches 100 energy again and goes back to Phase 1.
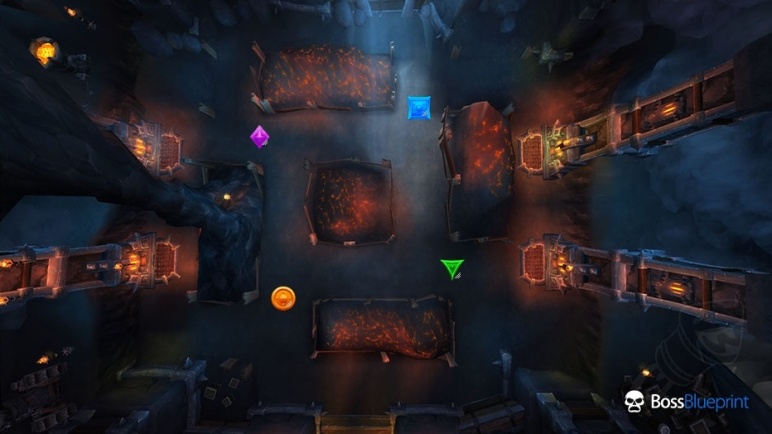
Phase 2 groups:
Once Phase 2 starts, use a  Stampeding Roar and an Stampeding Roar and an  Aspect of the Fox, and split to the 4 groups as showed in the picture above (Diamond, Circle, Triangle and Square Marker). Aspect of the Fox, and split to the 4 groups as showed in the picture above (Diamond, Circle, Triangle and Square Marker).
- Start off by killing the ore crates that spawn in the inner Square Circle of the room and then once those are dead, each group can continue killing the crates that are close to their assigned Marker. The reason why we want the inner crates down first is because Oregorger can only roll either to the left or to the right, never backwards.
- Now if there is no ore in either of the two possible roll routes, he will choose one at random, but if there is some ore exposed, he will always roll towards the route that has the most ore.
- By killing the inner crates first, you guarantee that he will roll around the middle at the start, which is very easy to dodge, before starting to do his outer, longer rolls.
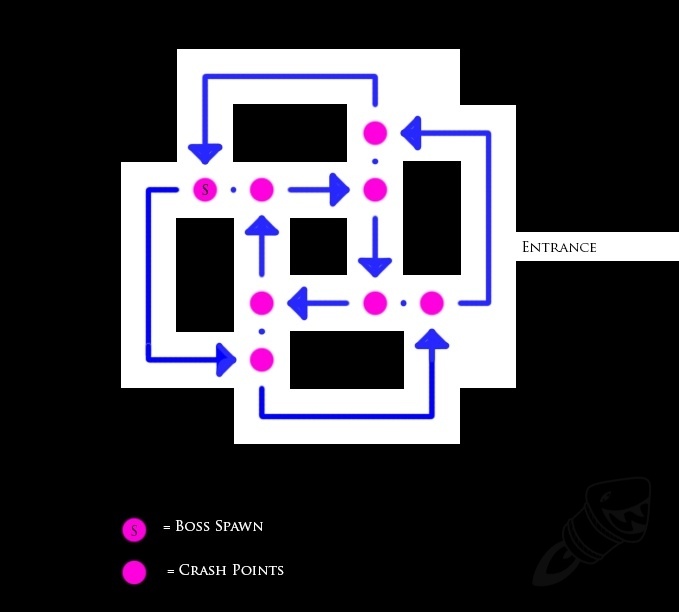
Oregorger possible Rolling Fury routes:
Note: Everyone must, at all times, check where the Boss is during this phase and be aware of the possible roll paths. The only time you are truly safe is when the Boss is diagonally across the room (e.g. If you are at the Diamond Marker group and the Boss has just smashed into a wall at the Triangle Marker. There is no chance that you are in danger for the next roll that he does).
The last thing you need to watch out for in Phase 2 are the Unstable Slag Explosions.
- Every time the Boss smashes into a wall, he will leave behind a ball of fire and if he smashes into these balls, it will create lava waves which go into all directions (not through walls), which might hit another one of these Unstable Slags and then another. Usually, if one of these Unstable Slags gets hit, it creates a chain reaction which leads to many lava waves going all over the room.
- The only thing you can do to avoid them is to move behind one of the outer walls, since none of the fire waves will ever go around those walls. Of course, these fire waves won't really kill you, so always prioritize dodging the Rolling Furies over theUnstable Slag fire waves.
- If you happen to be in a very tight situation, remember that immunities work for both the Rolling Furies and the Unstable Slag Explosions!
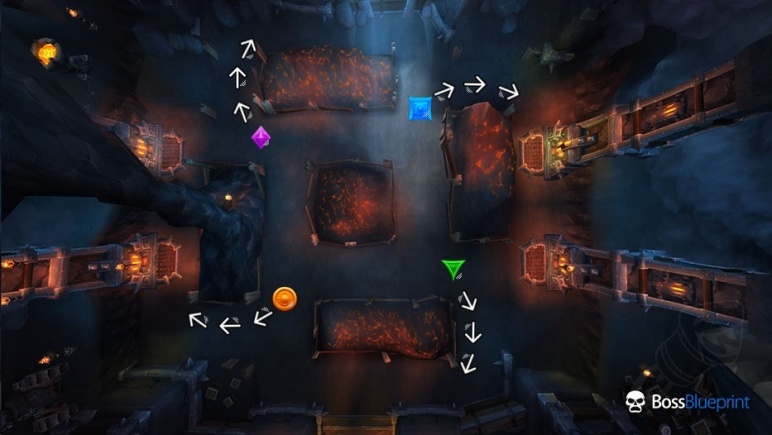
Movement to avoid the fire waves:
Phase 2 is primarily a personal survivability check, so once your raid members get used to the movements and you manage to get back to Phase 1 with everyone alive, you should have no trouble killing this Boss.
Hope this guide was helpful, if you have any questions please post them below and I will be happy to answer them. - Rogerbrown (Twitter: MethodRoger)
|


 Brewmaster Monk
 Death Knight
 Druid Boomkin
 Mage
Mage Prot Paladin
 Rogue
Rogue Shadow Priest